我们知道Dubbo逻辑上由以下几个模块组成(不考虑Monitor和Container)
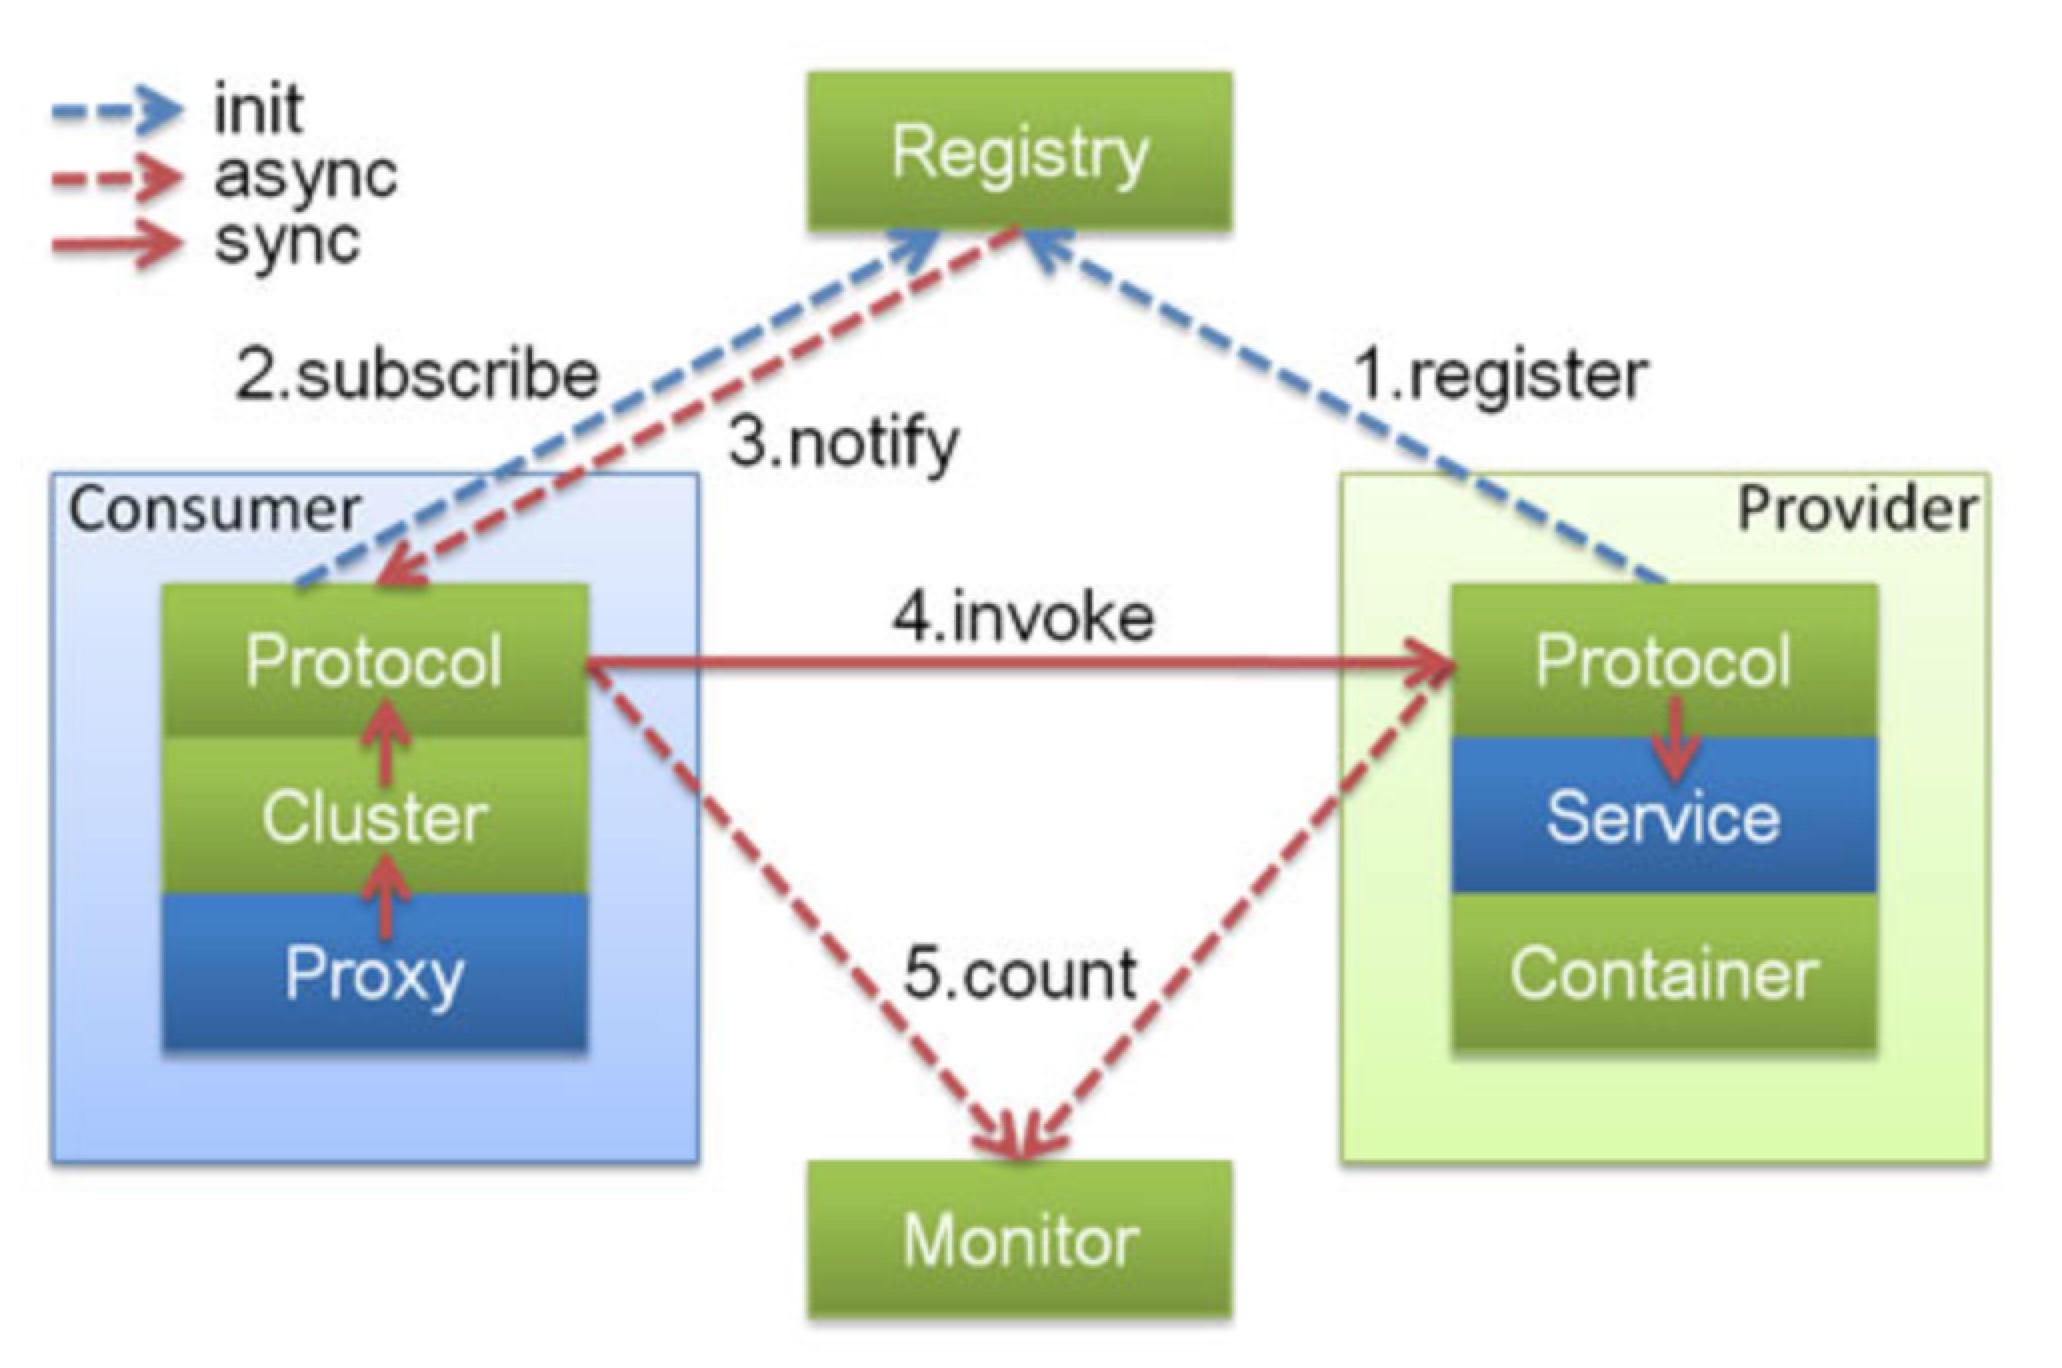
- Provider:服务提供方
- Consumer:服务消费方
- Registry:服务注册与发现的注册中心
上一篇文章Dubbo源码学习二(服务注册)我们分析了服务提供方启动时候怎么向注册中心注册服务,本文我们就来看下Consumer启动时候怎么引用服务的
consumer demo
<beans xmlns:xsi="http://www.w3.org/2001/XMLSchema-instance"
       xmlns:dubbo="http://dubbo.apache.org/schema/dubbo"
       xmlns="http://www.springframework.org/schema/beans"
       xsi:schemaLocation="http://www.springframework.org/schema/beans http://www.springframework.org/schema/beans/spring-beans-4.3.xsd
       http://dubbo.apache.org/schema/dubbo http://dubbo.apache.org/schema/dubbo/dubbo.xsd">

    <!-- consumer's application name, used for tracing dependency relationship (not a matching criterion),
    don't set it same as provider -->
    <dubbo:application name="demo-consumer"/>

    <!-- use multicast registry center to discover service -->
    <dubbo:registry address="zookeeper://localhost:2181?client=curator"/>

    <!-- generate proxy for the remote service, then demoService can be used in the same way as the
    local regular interface -->
    <dubbo:reference proxy="jdk" id="demoService" check="false" interface="org.apache.dubbo.demo.DemoService"/>
</beans>
public class Consumer {
public static void main(String[] args) {
//Prevent to get IPV6 address,this way only work in debug mode
//But you can pass use -Djava.net.preferIPv4Stack=true,then it work well whether in debug mode or not
System.setProperty("java.net.preferIPv4Stack", "true");
ClassPathXmlApplicationContext context = new ClassPathXmlApplicationContext(new String[]{"META-INF/spring/dubbo-demo-consumer.xml"});
context.start();
DemoService demoService = (DemoService) context.getBean("demoService"); // get remote service proxy
String hello = demoService.sayHello("world");
System.out.println(hello); // get result
}
}上述xmldubbo:reference同上一篇中的dubbo:service一样都是自定义scheme标签。dubbo:service声明一个服务并注册到注册中心,dubbo:reference会生成对上述服务的代理。同理,dubbo:service会对应到ReferenceBean。
ReferenceBean
ReferenceBean
public class ReferenceBean<T> extends ReferenceConfig<T> implements FactoryBean, ApplicationContextAware, InitializingBean, DisposableBean {
    @Override
    public Object getObject() throws Exception {
        return get();
    }
}
ReferenceBean实现了FactoryBean接口
DemoService demoService = (DemoService) context.getBean("demoService"); // get remote service proxy在调用上述方法获取DemoService会通过调用getObject方法来获取实例。进而会调用到父类ReferenceConfig的init()方法,init方法又会调用createProxy()方法,这个方法主要完成了以下逻辑
- 判断是否本地引用,如果只是本地引用,则通过InjvmExporter生成invoker
- invoker = refprotocol.refer(interfaceClass, urls.get(0));
这里urls.get(0).getProtocol()=registry,则会调用到RegistryProtocol的refer方法 - 最后通过return (T) proxyFactory.getProxy(invoker);返回invoker的一个代理对象
RegistryProtocol
refer方法会调用doRefer()方法
RegistryProtocol
private <T> Invoker<T> doRefer(Cluster cluster, Registry registry, Class<T> type, URL url) {
    RegistryDirectory<T> directory = new RegistryDirectory<T>(type, url);
    directory.setRegistry(registry);
    directory.setProtocol(protocol);
    // all attributes of REFER_KEY
    Map<String, String> parameters = new HashMap<String, String>(directory.getUrl().getParameters());
    URL subscribeUrl = new URL(Constants.CONSUMER_PROTOCOL, parameters.remove(Constants.REGISTER_IP_KEY), 0, type.getName(), parameters);
    if (!Constants.ANY_VALUE.equals(url.getServiceInterface())
            && url.getParameter(Constants.REGISTER_KEY, true)) {
        registry.register(subscribeUrl.addParameters(Constants.CATEGORY_KEY, Constants.CONSUMERS_CATEGORY,
                Constants.CHECK_KEY, String.valueOf(false)));
    }
    directory.subscribe(subscribeUrl.addParameter(Constants.CATEGORY_KEY,
            Constants.PROVIDERS_CATEGORY
                    + "," + Constants.CONFIGURATORS_CATEGORY
                    + "," + Constants.ROUTERS_CATEGORY));

    Invoker invoker = cluster.join(directory);
    ProviderConsumerRegTable.registerConsumer(invoker, url, subscribeUrl, directory);
    return invoker;
}
上述方法大体逻辑如下:
- registry.register会向注册中心注册Consumer信息,会向zk
/dubbo/org.apache.dubbo.demo.DemoService/consumers目录写入的URL地址 - 通过directory.subscribe订阅服务地址列表
- 通过cluster.join(directory)生成invoker,其中缓存了RegistryDirectory(包括服务的所有地址,路由协议之类的)
RegistryDirectory
RegistryDirectory提供了一个目录服务,缓存了注册中心提供指定服务的URL地址并封装成若干invoker,并缓存了路由协议。同时RegistryDirectory实现了NotifyListener接口,当一个服务的相关信息发生改变后,会通过回调notify方法来修改服务的信息。
RegistryDirectory
public void subscribe(URL url) {
    setConsumerUrl(url);
    registry.subscribe(url, this);
}
上述方法会调用到父类FailbackRegistry将RegistryDirectory自身添加到listeners,zk service相关信息改变时会回调该listener。进而调用到ZookeeperRegistry的doSubscribe方法,该方法会获取
/dubbo/org.apache.dubbo.demo.DemoService/目录下providers,configurators,routers目录的children信息。然后经过一系列调用到RegistryDirectory的refreshInvoker方法
private void refreshInvoker(List<URL> invokerUrls) {
    if (invokerUrls != null && invokerUrls.size() == 1 && invokerUrls.get(0) != null
            && Constants.EMPTY_PROTOCOL.equals(invokerUrls.get(0).getProtocol())) {
        this.forbidden = true; // Forbid to access
        this.methodInvokerMap = null; // Set the method invoker map to null
        destroyAllInvokers(); // Close all invokers
    } else {
        this.forbidden = false; // Allow to access
        Map<String, Invoker<T>> oldUrlInvokerMap = this.urlInvokerMap; // local reference
        if (invokerUrls.isEmpty() && this.cachedInvokerUrls != null) {
            invokerUrls.addAll(this.cachedInvokerUrls);
        } else {
            this.cachedInvokerUrls = new HashSet<URL>();
            this.cachedInvokerUrls.addAll(invokerUrls);//Cached invoker urls, convenient for comparison
        }
        if (invokerUrls.isEmpty()) {
            return;
        }
        Map<String, Invoker<T>> newUrlInvokerMap = toInvokers(invokerUrls);// Translate url list to Invoker map
        Map<String, List<Invoker<T>>> newMethodInvokerMap = toMethodInvokers(newUrlInvokerMap); // Change method name to map Invoker Map
        // state change
        // If the calculation is wrong, it is not processed.
        if (newUrlInvokerMap == null || newUrlInvokerMap.size() == 0) {
            logger.error(new IllegalStateException("urls to invokers error .invokerUrls.size :" + invokerUrls.size() + ", invoker.size :0. urls :" + invokerUrls.toString()));
            return;
        }
        this.methodInvokerMap = multiGroup ? toMergeMethodInvokerMap(newMethodInvokerMap) : newMethodInvokerMap;
        this.urlInvokerMap = newUrlInvokerMap;
        try {
            destroyUnusedInvokers(oldUrlInvokerMap, newUrlInvokerMap); // Close the unused Invoker
        } catch (Exception e) {
            logger.warn("destroyUnusedInvokers error. ", e);
        }
    }
}
上述方法大体逻辑如下:
- 缓存invokerUrls,invokerUrls是提供某服务的所有机器URL集合
- 将该服务对应的所有URL转换成Invoker并缓存到urlInvokerMap里面
- 每次都会将新生成的urlInvokerMap和之前的对比,destroy掉没有使用的invoker
下面主要分析下上述第二个步骤。
RegistryDirectory.toInvokers()
invoker = new InvokerDelegate<T>(protocol.refer(serviceType, url), url, providerUrl);根据url.getProtocol=”dubbo”,上述方法又会调用到DubboProtocol的
refer方法,注意同之前一样中间还有两个包装类ProtocolListenerWrapper和ProtocolFilterWrapper,这个类我们先看下
ProtocolFilterWrapper
private static <T> Invoker<T> buildInvokerChain(final Invoker<T> invoker, String key, String group) {
    Invoker<T> last = invoker;
    List<Filter> filters = ExtensionLoader.getExtensionLoader(Filter.class).getActivateExtension(invoker.getUrl(), key, group);
    if (!filters.isEmpty()) {
        for (int i = filters.size() - 1; i >= 0; i--) {
            final Filter filter = filters.get(i);
            final Invoker<T> next = last;
            last = new Invoker<T>() {

                @Override
                public Class<T> getInterface() {
                    return invoker.getInterface();
                }

                @Override
                public URL getUrl() {
                    return invoker.getUrl();
                }

                @Override
                public boolean isAvailable() {
                    return invoker.isAvailable();
                }

                @Override
                public Result invoke(Invocation invocation) throws RpcException {
                    return filter.invoke(next, invocation);
                }

                @Override
                public void destroy() {
                    invoker.destroy();
                }

                @Override
                public String toString() {
                    return invoker.toString();
                }
            };
        }
    }
    return last;
}

@Override
public <T> Invoker<T> refer(Class<T> type, URL url) throws RpcException {
    if (Constants.REGISTRY_PROTOCOL.equals(url.getProtocol())) {
        return protocol.refer(type, url);
    }
    return buildInvokerChain(protocol.refer(type, url), Constants.REFERENCE_FILTER_KEY, Constants.CONSUMER);
}
上述refer方法,因为此时url.getProtocol()=”dubbo”,所以会走到buildInvokerChain()方法,该方法通过ExtensionLoader获取所有对consumer自动激活的扩展Filters(默认情况包括ConsumerContextFilter,FutureFilter和MonitorFilter),然后通过责任链设计模式包装invoker。下面就来看下该类包装前的invoker是怎么生成的。继续到DubboProtocol的refer方法
DubboProtocol
@Override
public <T> Invoker<T> refer(Class<T> serviceType, URL url) throws RpcException {
    optimizeSerialization(url);
    // create rpc invoker.
    DubboInvoker<T> invoker = new DubboInvoker<T>(serviceType, url, getClients(url), invokers);
    invokers.add(invoker);
    return invoker;
}
上述方法getClients(url)==>ExchangeClient connect==>
HeaderExchanger.connect==>Transporters.connect==>
NettyTransporter.connect==>NettyClient.doOpen()
@Override
protected void doOpen() throws Throwable {
    final NettyClientHandler nettyClientHandler = new NettyClientHandler(getUrl(), this);
    bootstrap = new Bootstrap();
    bootstrap.group(nioEventLoopGroup)
            .option(ChannelOption.SO_KEEPALIVE, true)
            .option(ChannelOption.TCP_NODELAY, true)
            .option(ChannelOption.ALLOCATOR, PooledByteBufAllocator.DEFAULT)
            //.option(ChannelOption.CONNECT_TIMEOUT_MILLIS, getTimeout())
            .channel(NioSocketChannel.class);

    if (getTimeout() < 3000) {
        bootstrap.option(ChannelOption.CONNECT_TIMEOUT_MILLIS, 3000);
    } else {
        bootstrap.option(ChannelOption.CONNECT_TIMEOUT_MILLIS, getTimeout());
    }

    bootstrap.handler(new ChannelInitializer() {

        @Override
        protected void initChannel(Channel ch) throws Exception {
            NettyCodecAdapter adapter = new NettyCodecAdapter(getCodec(), getUrl(), NettyClient.this);
            ch.pipeline()//.addLast("logging",new LoggingHandler(LogLevel.INFO))//for debug
                    .addLast("decoder", adapter.getDecoder())
                    .addLast("encoder", adapter.getEncoder())
                    .addLast("handler", nettyClientHandler);
        }
    });
}
可以看到经过上述一系列调用,最终又是通过Netty与提供服务的Provider建立一个长连接(之前Provider也是通过netty监听20880端口从而监听客户端请求)。这里如果同一个服务有多个不同的Provider,就和所有的Provider通过netty建立了连接。这样就完成了从URL到Invoker的转化,并缓存到Map<String, Invoker
ReferenceConfig
回到ReferenceConfig的createProxy()方法
private static final ProxyFactory proxyFactory = ExtensionLoader.getExtensionLoader(ProxyFactory.class).getAdaptiveExtension();

return (T) proxyFactory.getProxy(invoker);
<dubbo:reference proxy="jdk" id="demoService" check="false" interface="org.apache.dubbo.demo.DemoService"/>
@SPI("javassist")
public interface ProxyFactory {
/**
* create proxy.
*
* @param invoker
* @return proxy
*/
@Adaptive({Constants.PROXY_KEY})
<T> T getProxy(Invoker<T> invoker) throws RpcException;
/**
* create proxy.
*
* @param invoker
* @return proxy
*/
@Adaptive({Constants.PROXY_KEY})
<T> T getProxy(Invoker<T> invoker, boolean generic) throws RpcException;
/**
* create invoker.
*
* @param <T>
* @param proxy
* @param type
* @param url
* @return invoker
*/
@Adaptive({Constants.PROXY_KEY})
<T> Invoker<T> getInvoker(T proxy, Class<T> type, URL url) throws RpcException;
}最开始我们在dubbo:reference指定了proxy=”jdk”,中间也会经过若干包装类StubProxyFactoryWrapper(这个类用来实现本地存根的,远程服务后,客户端通常只剩下接口,而实现全在服务器端,但提供方有些时候想在客户端也执行部分逻辑。此时就需要在 API 中带上 Stub,客户端生成 Proxy 实例,会把 Proxy 通过构造函数传给 Stub [1],然后把 Stub 暴露给用户,Stub 可以决定要不要去调 Proxy,具体可以参考本地存根),最终就会调用到JdkProxyFactory.getProxy()方法。
JdkProxyFactory
public class JdkProxyFactory extends AbstractProxyFactory {
    @Override
    @SuppressWarnings("unchecked")
    public <T> T getProxy(Invoker<T> invoker, Class<?>[] interfaces) {
        return (T) Proxy.newProxyInstance(Thread.currentThread().getContextClassLoader(), interfaces, new InvokerInvocationHandler(invoker));
    }

    @Override
    public <T> Invoker<T> getInvoker(T proxy, Class<T> type, URL url) {
        return new AbstractProxyInvoker<T>(proxy, type, url) {
            @Override
            protected Object doInvoke(T proxy, String methodName,
                                      Class<?>[] parameterTypes,
                                      Object[] arguments) throws Throwable {
                Method method = proxy.getClass().getMethod(methodName, parameterTypes);
                return method.invoke(proxy, arguments);
            }
        };
    }
}
上述JdkProxyFactory的getProxy方法显示是通过JDK自带的动态代理来封装引用的服务,本例是org.apache.dubbo.demo.DemoService,方法传入了之前生成的invoker,用来生成InvokerInvocationHandler。
InvokerInvocationHandler
public class InvokerInvocationHandler implements InvocationHandler {

    private final Invoker<?> invoker;

    public InvokerInvocationHandler(Invoker<?> handler) {
        this.invoker = handler;
    }

    @Override
    public Object invoke(Object proxy, Method method, Object[] args) throws Throwable {
        String methodName = method.getName();
        Class<?>[] parameterTypes = method.getParameterTypes();
        if (method.getDeclaringClass() == Object.class) {
            return method.invoke(invoker, args);
        }
        if ("toString".equals(methodName) && parameterTypes.length == 0) {
            return invoker.toString();
        }
        if ("hashCode".equals(methodName) && parameterTypes.length == 0) {
            return invoker.hashCode();
        }
        if ("equals".equals(methodName) && parameterTypes.length == 1) {
            return invoker.equals(args[0]);
        }

        RpcInvocation invocation;
        if (RpcUtils.hasGeneratedFuture(method)) {
            Class<?> clazz = method.getDeclaringClass();
            String syncMethodName = methodName.substring(0, methodName.length() - Constants.ASYNC_SUFFIX.length());
            Method syncMethod = clazz.getMethod(syncMethodName, method.getParameterTypes());
            invocation = new RpcInvocation(syncMethod, args);
            invocation.setAttachment(Constants.FUTURE_GENERATED_KEY, "true");
            invocation.setAttachment(Constants.ASYNC_KEY, "true");
        } else {
            invocation = new RpcInvocation(method, args);
            if (RpcUtils.hasFutureReturnType(method)) {
                invocation.setAttachment(Constants.FUTURE_RETURNTYPE_KEY, "true");
                invocation.setAttachment(Constants.ASYNC_KEY, "true");
            }
        }
        return invoker.invoke(invocation).recreate();
    }
}
上述代码就可以看到,在客户端真正调用某方法时候
demoService.sayHello(“world”);就会通过jdk动态代理调用到上述
InvokerInvocationHandler的invoke方法。invoke方法会通过invoker方法来完成后续操作。